Soil solarization in greenhouses: a four-stage project
In Lebanese greenhouses, soil fatigue often appears before a grower can name the cause. Tomatoes lose vigor in the same beds where they once grew strongly.
Roots develop poorly, irrigation becomes less even, and disease returns after transplanting despite careful removal of infected plants. Repeated cropping, compacted soil, residual roots, and warm, moist conditions create a favourable environment for soilborne pathogens and nematodes.
Greenhouse soil solarization offers a practical way to interrupt that cycle without immediately reaching for chemical fumigants. The method uses solar heat, water, and a tightly sealed transparent plastic sheet to raise soil temperatures high enough to suppress many pathogens, nematodes, and weeds. It is not a single afternoon task. The result depends on completing four linked stages: preparing the soil, wetting it deeply, sealing it with the correct plastic, and monitoring heat accumulation over several weeks.
The science is straightforward. Wet soil transfers heat more efficiently than dry soil. Clear plastic allows solar radiation to enter and traps heat close to the soil surface. A loose sheet, dry seedbed, or poorly sealed edge breaks that chain. Greenhouse soil solarization steps are therefore less about buying a special product and more about managing the physical conditions that let heat move through the soil profile.
Stage one: prepare the bed so heat can travel
Solarization begins with the soil surface, not the plastic. Any unevenness, large clods, crop residue, or air pockets can reduce the contact between the film and the ground. Those small gaps matter because they allow heat to escape and create cooler pockets where pathogens may survive.
Clear the greenhouse bed thoroughly. Remove crop residues, old roots, trellis fragments, weeds, and irrigation equipment that would prevent the plastic from lying flat. Diseased plant material should not simply be incorporated into the bed as if it were ordinary organic matter. Solarization can suppress many soilborne organisms, but it should not be treated as a guarantee that every pathogen in every piece of residue has been eliminated.
Till or dig the soil to the depth normally used for bed preparation. The objective is not to create an unusually deep cultivation layer. It is to break up compaction, distribute organic residues, and leave the upper soil profile sufficiently uniform for heat penetration. Large clods behave like thermal obstacles: the outside warms while the interior remains cooler. A finely prepared, level surface gives the plastic closer contact and makes the treatment more consistent.
This is also the point to correct obvious drainage problems. Solarization requires substantial wetting before the film is installed. If the bed holds water in one area and dries rapidly in another, the greenhouse will receive an uneven treatment. Waterlogging is not the same as good soil moisture; it can damage structure and make later planting difficult. The target is a uniformly moist soil profile, not a flooded one.
A simple preparation sequence is:
1. Remove the previous crop and visible weeds, including as much root material as practical.
2. Break up compaction and large clods through tilling or careful digging.
3. Level the bed so the plastic can lie close to the soil surface.
4. Repair or reposition irrigation lines if they would interfere with full plastic contact.
5. Check that water can move evenly through the intended solarization area.
6. Leave the surface ready for deep wetting before the film is laid.
The soil does not need to look sterile or bare to be ready. It needs to be physically even, moistenable, and free of objects that could puncture the plastic. A greenhouse operator who rushes through this first stage may still see high temperatures at the surface, yet fail to heat the deeper portions of the root zone evenly.
Stage two: use water as part of the heat system
Moisture is not an optional preparation step. It is one of the mechanisms that makes soil solarization work.
Before sealing the bed, moisten the soil to a depth of approximately 6 to 12 inches, or 15 to 30 centimetres. Dry soil contains more air and transfers heat less efficiently. Wet soil conducts heat faster, and heat-sensitive soil organisms are more vulnerable when the soil profile is uniformly moist.
The most reliable approach is to apply water gradually enough for it to move through the bed rather than run across the surface. In a greenhouse with drip lines, the lines can often be used for pre-wetting, provided they distribute water across the entire solarized area. Where the wetting pattern is uncertain, inspect the soil directly rather than assuming that a damp surface means the full profile is wet.
The depth matters because many greenhouse problems are rooted below the first few centimetres. A surface that feels moist while the soil remains dry lower down can produce a misleading sense of readiness. Solarization temperatures are usually highest in the top 2 to 6 inches, where they can reach approximately 108°F to 140°F, or 42°C to 60°C, under favourable summer conditions. Temperatures decline with depth. At around 18 inches, reported soil temperatures may be closer to 90°F to 99°F, or 32°C to 37°C. Deep wetting helps move useful heat downward, but it does not turn the entire soil profile into a uniformly heated block.
The plastic traps the heat, but the water carries it through the soil. Remove either part of the system and the treatment becomes shallow and uneven.
Moistening also changes the biological response of the soil. Heating accelerates the breakdown of organic material, which can increase the availability of soluble nutrients such as nitrate, ammonium, calcium, magnesium, and potassium after treatment. That is useful, but it is not a substitute for a soil test. Solarization does not remove the need to understand nutrient levels, salinity, pH, or the condition of the soil before the next crop.
For Lebanese greenhouse operations, this distinction is particularly practical. A bed may have enough soluble nitrogen after solarization but still suffer from poor structure, excessive salts, or an imbalanced fertilization programme. Replanting immediately with a heavier feeding schedule, without checking what the treatment has changed, can create a second problem while trying to solve the first.
Stage three: choose clear plastic and seal it tightly
The choice of film determines whether the greenhouse soil preparation process becomes a thermal treatment or merely a covering exercise.
Use clear, UV-stabilized polyethylene plastic. Black or opaque plastic is not the preferred material for solarization because it blocks much of the solar radiation that needs to pass through the film. Transparent plastic allows sunlight to enter and traps heat through a greenhouse effect close to the soil surface.
Film thickness can range from approximately 0.5 to 4 mil, with 1.5 mil commonly recommended as a practical balance between durability and heat transmission. The correct choice depends on how the sheet will be handled, the condition of the greenhouse floor, and the likelihood of wind movement or accidental puncture. Thicker is not automatically better if the material is difficult to deploy without creating gaps; thinner is not economical if it tears during installation.
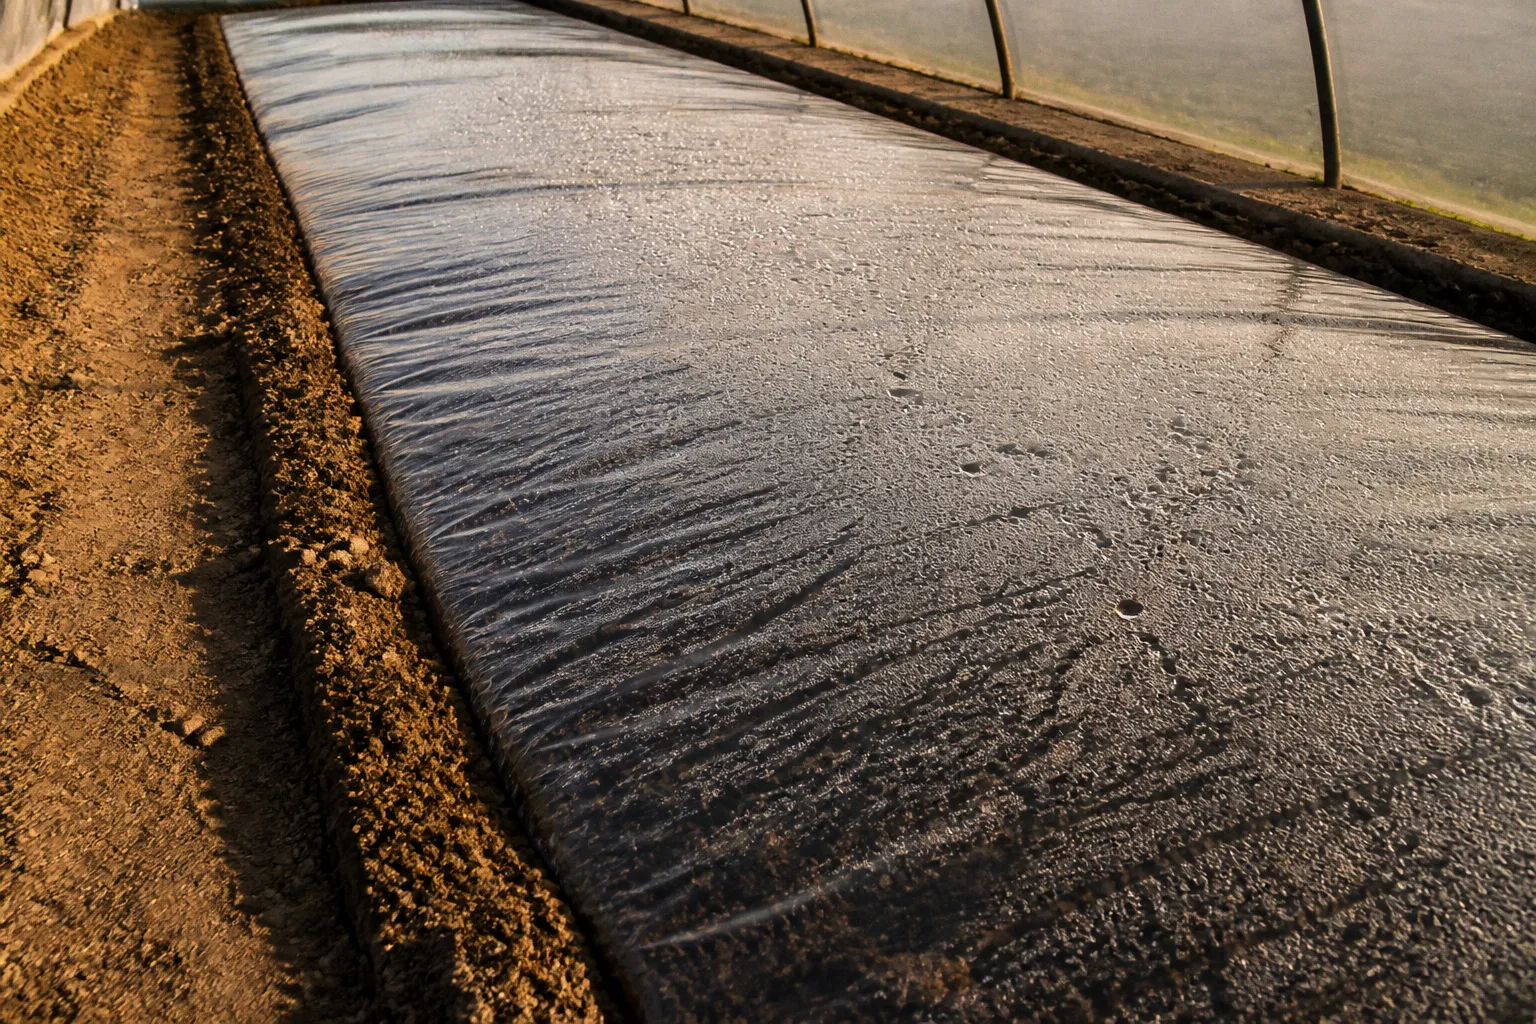
Lay the plastic as close to the moist soil as possible. Smooth out folds, but avoid dragging the film across sharp stones or unfinished bed edges. The sheet should cover the full treatment area. If several pieces are required, the overlaps need to remain closed and stable rather than lifting in the heat.
The edges are where many solarization projects fail. Bury the perimeter under soil to create a continuous seal. This prevents heat from escaping, limits air circulation beneath the film, and reduces the risk of wind lifting the sheet. A few loose centimetres at the edge can create a long cool strip around the bed. In a greenhouse, where the walls may reduce wind compared with an open field, edge sealing is still mandatory: the objective is to retain heat, not simply to keep the plastic in place.
Before leaving the bed, inspect the installation from several angles. Look for:
- exposed soil along the perimeter;
- folds that lift the film well above the ground;
- stones, metal, or crop supports that may puncture the sheet;
- open overlaps between adjoining pieces;
- dry areas that were missed during pre-wetting;
- irrigation lines or tools trapped in a way that creates large air spaces.
A tight installation also makes monitoring easier. When the film remains in close contact with the soil, temperature readings have a clearer relationship to the treated bed. When it is floating over ridges and hollows, a very hot reading in one location may say little about the rest of the greenhouse.
Stage four: hold the heat long enough
Solarization is measured in weeks, not hours. In Mediterranean climates, the strongest treatment window is generally from mid-June through September, with June 15 to September 1 identified as a useful seasonal period when conditions are favourable. The target duration is usually four to six weeks. In cooler regions or less intense conditions, the treatment may need to continue for up to eight weeks.
Air temperature above approximately 80°F to 85°F, or 27°C to 29°C, supports the process, but outside air temperature alone does not confirm that the soil is receiving sufficient heat. The important measurement is the soil temperature within the covered bed, particularly at more than one depth and location.
A practical monitoring arrangement includes:
| What to monitor | Why it matters | What a problem may indicate |
|---|---|---|
| Soil temperature in the upper 2–6 inches | This is where maximum temperatures are expected and where many soilborne organisms are exposed to the strongest heat | Poor film contact, cloudier conditions, leaks, or insufficient solar intensity |
| Soil temperature at deeper points | Shows whether heat is moving beyond the surface layer | Dry soil, compaction, uneven wetting, or an excessively short treatment |
| Plastic edges and overlaps | Confirms that the thermal envelope remains closed | Wind lift, incomplete burial, or shrinking and movement of the film |
| Soil moisture beneath the film | Indicates whether the bed remains capable of conducting heat | Leakage, inadequate initial wetting, or drainage problems |
| Treatment dates and weather conditions | Creates a usable record for future crop planning and buyer documentation | Uncertainty about whether the full treatment period was completed |
The upper soil layers may reach 108°F to 140°F, or 42°C to 60°C, under optimal summer conditions. That range is sufficient to significantly suppress organisms such as Fusarium, Pythium, and Verticillium, along with root-knot nematodes. It can also reduce weed pressure. The treatment is not a promise of total eradication, particularly for deep-rooted perennial weeds or heat-resistant organisms at depth.
The distinction between suppression and eradication is more than a technical detail. If a greenhouse has a persistent history of disease, solarization should be part of a broader soil management plan that includes crop rotation where possible, sanitation, irrigation control, drainage, and appropriate nutrient management. Treating one bed once cannot compensate for repeatedly introducing contaminated tools, planting material, water, or crop residues.
What happens to the soil after heating
The thermal effect is the main reason growers solarize, but the soil also changes chemically and biologically during the treatment.
Heat speeds the decomposition of organic material. As that material breaks down, soluble forms of nitrogen, calcium, magnesium, and potassium can become more available to the next crop. This may improve early nutrient supply, but it can also alter the balance that the grower expects from the previous fertilization programme.
For that reason, avoid treating the end of solarization as the beginning of an automatic fertilizer application. First assess the soil. A post-treatment test can help identify whether nutrients are already readily available, whether salinity has become a concern, and whether the planned crop requires a different input strategy. Solarization is a disinfestation method; it is not a complete fertility programme.
The biological effects also need a measured interpretation. The treatment reduces many harmful organisms, but it does not create a permanently sterile soil. Soil microbiology is dynamic. Beneficial organisms will recolonize the bed, and the next crop will again shape the microbial community through roots, residues, irrigation, and inputs. The long-term resilience of the greenhouse still depends on how the bed is managed between crops.
This is where the method connects to export production. Buyers and certification systems often expect growers to demonstrate control over inputs, crop protection, hygiene, and traceability. A documented solarization record—material used, installation date, treatment period, moisture preparation, temperature observations, and any post-treatment soil testing—can support that broader production history. It does not automatically satisfy a particular certification scheme, and the plastic and related materials should be checked against the requirements of the target market. But a recorded, reproducible process is easier to defend than an informal claim that a bed was simply covered during summer.
For cooperatives, standardization is especially valuable. A shared protocol allows several growers to report the same stages and measurements without pretending that every greenhouse has identical conditions. One farm may have deeper beds, another more shade, and another a different plastic layout. The method can remain consistent while the observations reveal where local adjustments are needed.
Common failures in greenhouse soil solarization
Most weak results are caused by a break in the chain between preparation, moisture, plastic, and time.
A dry soil profile
A darkened or humid-looking surface can hide dry soil below. Without moisture at 6 to 12 inches, heat moves less efficiently through the bed. The result is often a hot surface and a cooler root-zone depth.
Black plastic used by mistake
Black film may suppress weeds by blocking light, but it is not the preferred material for solarization. Clear, UV-stabilized polyethylene is needed to admit solar radiation and build the greenhouse effect beneath the sheet.
Loose edges
An unburied edge allows hot air to escape and creates a path for wind to lift the film. Sealing the perimeter with soil is a basic part of the protocol, not a finishing detail.
A short treatment window
A few very hot days do not equal four to six weeks of solarization. The process relies on sustained heat exposure. Removing the film early because the soil feels warm sacrifices the cumulative effect.
Uneven preparation
Large clods, ridges, stones, and hollows create areas with poor film contact. These may remain cooler even while a nearby temperature sensor records a strong result.
Treating the soil but ignoring the production system
A solarized bed can be reinfected through dirty tools, diseased transplants, contaminated irrigation water, or unmanaged residues. The treatment reduces pressure; it does not replace sanitation and crop planning.
Replanting without reassessing fertility
Because solarization can increase the availability of soluble nutrients, the next crop may not need the same inputs as an untreated bed. Soil testing and a measured fertilization plan are more reliable than applying the previous programme unchanged.
A seasonal working calendar
The most useful solarization plan is one that fits between crops rather than competing with them.
Before the summer treatment: finish the crop cycle, remove plant material, repair irrigation, and prepare the beds. If the greenhouse has a recurring disease pattern, record which beds are affected so the treatment can be compared with later crop performance.
At installation: till and level the soil, wet it to 6–12 inches, lay clear UV-stabilized polyethylene, and bury every edge. Mark the start date and place temperature monitoring points where they represent both the upper soil and deeper profile.
During weeks one and two: inspect for punctures, lifted corners, open overlaps, and areas where the plastic is no longer close to the soil. Correct physical failures immediately. Do not judge the process solely by the temperature at one sunny point.
During weeks three and four: maintain the seal and continue recording soil conditions. Under strong Mediterranean summer conditions, this is within the core treatment window, but the full period still depends on the greenhouse environment and the consistency of heating.
Weeks five to eight, if needed: extend the treatment when conditions are cooler, the greenhouse receives less solar exposure, or deeper soil heating has been slow. Cooler locations may require the longer end of the four-to-eight-week range.
After removing the plastic: inspect the bed, allow it to return to a workable condition, and assess soil fertility before planting. Avoid unnecessary disturbance that could bring untreated deeper soil to the surface. Clean tools and manage planting material so the treated bed is not immediately exposed to a new source of contamination.
Solarization is most effective when treated as an infrastructure project: the preparation, sealing, records, and aftercare matter as much as the plastic itself.
A practical protocol for cooperative farms
For a Lebanese cooperative, the method becomes easier to manage when the protocol is written at the level of the bed rather than described as a general seasonal activity. Each participating greenhouse can record:
- the bed or greenhouse identifier;
- the previous crop and visible disease history;
- the date of clearing and tilling;
- the approximate wetting depth;
- the plastic type and thickness;
- the date the film was installed;
- the locations and depths of temperature checks;
- repairs made during the treatment;
- the date the film was removed;
- post-treatment soil observations and test results.
This record has two functions. Agronomically, it helps explain why one greenhouse responds better than another. Commercially, it gives the cooperative a clearer production history when buyers ask how soilborne disease and chemical inputs are being managed.
The strength of solarization is its simplicity, but simple does not mean casual. The method uses a familiar Mediterranean resource—summer heat—and turns it into a controlled soil management tool. When the bed is level, the soil is wet deeply, the clear film is sealed tightly, and the treatment lasts long enough, the greenhouse can enter the next crop cycle with lower pressure from several important soilborne problems.
The best time to plan the next solarization is before the current crop is finished. Reserve the summer window, source the correct transparent film, arrange temperature monitoring, and leave enough time for four to eight weeks of treatment plus soil assessment before planting. That seasonal discipline is what turns a sheet of plastic into a repeatable greenhouse soil solarization protocol.